Saturday, October 10, 2009

A Silly Face for Halloween

Well isn't this guy just cute as can be?  I just loved his face when I finished him.  He just makes you feel good.


I decided to make him simple with some dry brushed cheeks and a basic smile.  I wanted his nose to be 3D so I used black polymer clay and added some nostrils.  He's just a cutie.


I also added some black spatter paint for a bit of an aged look.  He has just been listed in my Etsy shop.  If you would like to own him click here.

Have a super weekend everyone,
Darlene

Thursday, August 6, 2009

Pumpkin Kettle Gourd

Hi everyone!
I've been busy creating again :-)

I used my burnt orange gourd ink again on this little gourd. I looked at this gourd on the shelf and I thought it looked like a cute pumpkin so I dyed it a complimentary color of fall and then added some nice purple and white roses and buds. A few leaves and vines around here and there for a nice decorative touch.

It would make a great accent to any fall arrangement in the home or a centerpiece for parties and dinners during the autumn season.

I will be making some whimsical faces too but I wanted a nice simple but elegant touch for the upcoming season. I just love it!


This is a pic of the back side.
Thanks so much for checking in....

Darlene

Saturday, July 25, 2009

Here it is.....my Southwestern beaded gourd

Sorry everyone.....I've been a bad bad blogger :-(

I had completed this gourd a week ago but just didn't get an opportunity to update an entry here with some pics. I really like how this birdhouse came out and it was fun to create.


I hand strung the beads in and out of small holes that I drilled around the entrance hole to the house. I then painted a simple wooden vine and leaves to compliment the colors of the beads.


A touch of raffia on the hanger...

This is the center back of the gourd in this picture.

Just a closer view of the painted vines and leaves.


Thanks for stopping by. I'm working on a pumpkin face next. Fall is just around the corner!!!!
Darlene

Wednesday, July 15, 2009

Hi Everyone....Happy Wednesday!

Below is a little tease of the new gourd I'm working on. It has a variety of beads hand strung including turquoise. It's turning out pretty great....come back and visit for the final reveal :-)


TFL
Darlene

Saturday, July 11, 2009

Thatched Roof Gourd Birdhouse

Hi everyone!
I've been working pretty hard in my craft room creating a few new gourd birdhouses out of my kettle gourds. I decided I wanted to make a house with a nice thatched roof look so this is my final product.


I used the berry gourd ink dye on this gourd and just love it. The color is very pretty but still soft and lets the natural gourd coloring show through. I can't wait to use the other colors expecially the orange for fall!

I added a few iridescent matte beads around the roof peak by hand sewing each one on. Just love the added touch!


This roof is made with cocoa liner.....it's very moldable and thick. It's fun to work with too.

Thanks for looking. I'll be back soon with more gourds and some fun fall pattern too!
Darlene

Friday, June 12, 2009

Gourd Ink Dyes and Pigment Powders

I have been quite busy lately helping my husband build a privacy fence for our backyard so I have been a bad blogger. I hope to be a little more productive within the next 2 months by posting some new gourd creations.

In the meantime, I wanted to share a few new purchases with you. I have wanted to use gourd ink dyes for quite a while now but just haven't made the purchase. Well since I love the earthy rustic look of some of the fall colors I decided to make an order of some Gourd Master products. Wow these are just wonderful colors. There are so many to choose from I wanted them all!


The colors of the pigments powder here are: Spring Green, Red Russet, Antique Bronze and Pumpkin Orange. I also chose the folowing ink dyes: Sage, Berry, Blue Denim, Sienna and Deep Orange. You can put the pigment powders over the inks for a beautiful metallic luster. I also am trying the Protecting Wax instead of the spar varnish for a more muted rustic feel.


Please check back for pics of projects I have created with my new goodies!

TFL!

Darlene

Friday, April 17, 2009

Crocus Kettle Gourd Birdhouse-Final Steps

I have finished the kettle gourd birdhouse. It was very enjoyable to paint with such bright vivid colors for a spring design.


I added 3 coats of exterior spar urethane (sanding lightly between each coat) for a very durable and long lasting finish. Since Michigan has such sever temperature changes, I always use the best product for the most extreme conditions.

This is a close-up of the flower detail.
I tied a bit of raffia around the hanger and added some seed beads for a nice touch. What bird wouldn't want some home decor accents right?
The hanger I use is a heavy duty suede cord tied at the end.

The front view of the final product.
I hope you try painting one of these birdhouses for your use. Caution.....it's pretty addicting!


Have a great week,

Darlene

Monday, April 6, 2009

This is not what I Call Spring Showers!

Well needless to say we here in Michigan have seen many different types of weather at many different times of the seasons. Just last week Tom and I were enjoying warm 60's and starting to put our wonderful homemade compost into the vegetable gardens preparing them for a nice new crop of garden delights this summer.

This is our wonderful composter.....it may not be pretty it makes beautiful compost.

From coffee grounds and vegetable trimmings to this beautiful "Black Gold" compost. Who could ask for more and it's all free too!

We knew this great weather may not last so we have been outside almost daily planning some new projects for the yard. We will be building a pergola and putting in a privacy fence and a nice wooden picket fence for the vegetable garden.
After having some nice conversation about these projects yesterday we also turned on the news and NOT to our amazement we heard about a Winter Storm Warning heading our way for Sunday night. We both just laughed and decided to chalk it up to "Michigan Weather" again. This is what we woke up to this morning.....let's hope it melts fast. We have yard work to do LOL!!!!

Enjoy your day...
Darlene

Kettle Gourd Birdhouse-Painting Process Continued

Step 2 - Painting the Design

After you have basecoated your entire gourd basecoat the crocus design with a light buttermilk color. I usually thin my paint and use 2-3 coats before it has good coverage.

Trace a light outline of the petal details.

I did a light wash of pink over the light basecoat and then began adding shades of purple.

I added two shades of purple on these petals and then added the stems and leaves using 2 shades of green and 2 shades of brown.

I added the stamens and white dots using shades of gold, yellow, rust and orange. A few vein lines were added with the darkest purple shade.


The next post I will show you the top of the gourd design and the final touches.

Saturday, April 4, 2009

Kettle Gourd Birhouse-Painting Process

Step 1 - Base Coating

I usually like to make the top section with a decorative edge and coordinating color but you can paint the entire gourd one color if you prefer. I mark a decorative edge around the top approximately 3" down from the top.


I used DecoArt Americana acrylic paint in Hauser Dark Green for the base coat. Since this color is very dark it takes 2-3 coats for nice coverage. Once the base coat is on I highlight over the entire area with Lt. Avocado and Hauser Light Green. It give the gourd a nice mottled look like you are looking through a nice blurry wooded area.


I draw out the flowers on paper and cut out around the pattern. Transfer your pattern onto the gourd using graphite paper. I decided to put two sets of crocus blossoms on each side of the entrance hole (in reverse directions) and then a set of three blossoms centered in the back. All the designs will be located coming from the bottom edge of the gourd as if they are growing from the ground.
I'll post more steps in the next few days everyone!

Darlene

Wednesday, April 1, 2009

Kettle Gourd Birdhouse with Crocus Design

HAPPY APRIL EVERYONE!

I'm in the mood for spring so I've been working on some new gourd birdhouses. This is one of the new designs for a spring gourd birdhouse. I thought I would share some of the process with you. Please feel free to use any of my ideas and paint a birdhouse for yourself. Change up the design and colors too! I'd love to see what you create. Please post a comment with a link to your creation. I love to see all the beautiful creations from the gourd artists out there :-)

First step.....Selection and Preparation

I always choose my individual gourd for a specific project and design. I have chosen this one for a wren/finch birdhouse with a nice spring crocus design. Sand and seal your gourd before drilling and drawing on your design.

I mark my 4 holes on the bottom of the gourd for drainage just in case wind blows and water gets into the birdhouse. You don't want those little babies to drown!


I also drill two holes for the hanger, 1 for the perch and a 1" hole for the entrance to the birdhouse (between 3-5" from the floor of the gourd).


Clean out all the loose seeds and debris that is inside the gourd. I use a dust mask so I don't inhale the gourd particles. They can cause lung irritation in some people.

The perch gets glued in with weather-proof glue.


I'll be back with more pics of the design and painting process later this week. Grab a gourd and paint along with me!
Have a great week,
Darlene

Monday, February 2, 2009

Handmade Mini Album - Part 2 of 2

I hope some of you are trying this mini album....it's fun to make!

After you have glued the spine you will need to add your decorative front and back covers.


Use the same gluing procedure getting out all the air bubbles with the bone folder as before. Then miter your corners. Run your bone folder around the craft board to make a slight indentation. This will help train your paper to fold up and around nice and neat. Go ahead and glue all edges of the front and back covers and smooth as before. Use the tip of the bone folder for a nice neat tuck at the mitered corners.


Now it's time to add the inside covers and inside spine. Just repeat the same process as the front of the mini album.


Once you have the spine glued then I run my bone folder down the edges and fold each cover back a forth a few times. Now it looks like a real book!

Punch two holes in the spine so you can attach a ribbon or fiber for the decorative handle. I use my cropadile for this since the crafty board is quite thick.

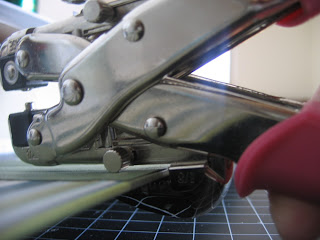
It should look like this.

Add your decorative handle by threading each end from the outside to the inside and tying a square knot. I add fray check to secure the knot.


I layer all my inside papers together and secure with 2 brads or eyelets. I attached two sequin flowers in the brushed silver brads for this book.

Now you have the front and back of all these paper sizes to scrapbook on. There's plenty of room for pictures and journaling and any other embellishements you choose to add.

Enjoy your book!